Sunday, December 19, 2010

Smokehouse Maple Flat Iron Steak with oven roasted onions and potatoes


Tonight is not too much like any other Sunday night, except for the fact that I am feeling quite under the weather and really would have liked someone else to make dinner for me. My stomach feels a little weird. And I'm completely exhausted. I was up until 3:30 am Saturday night and got up at 7:30am to get ready for church and then home to try to work on school work, just to get sidetracked into wrapping christmas presents to be shipped off tomorrow, along with christmas cards and a strong desire to make some christmas cookies. Needless to say, no homework done and very ADHD on everything else. So I didn't want to cook... alas,... I did anyways. :)

Tonight is a very EASY and I stress EASY! not a lot of prep and just easy peasy...

Ingredients
Smokehouse maple seasoning by McCormick
1.5 to 2 lb Flat Iron Steak
2 onions large sliced
4 potatoes (medium to large) cut into chunks with skins on
1/3 cup oil
1 pkg onion soup mix

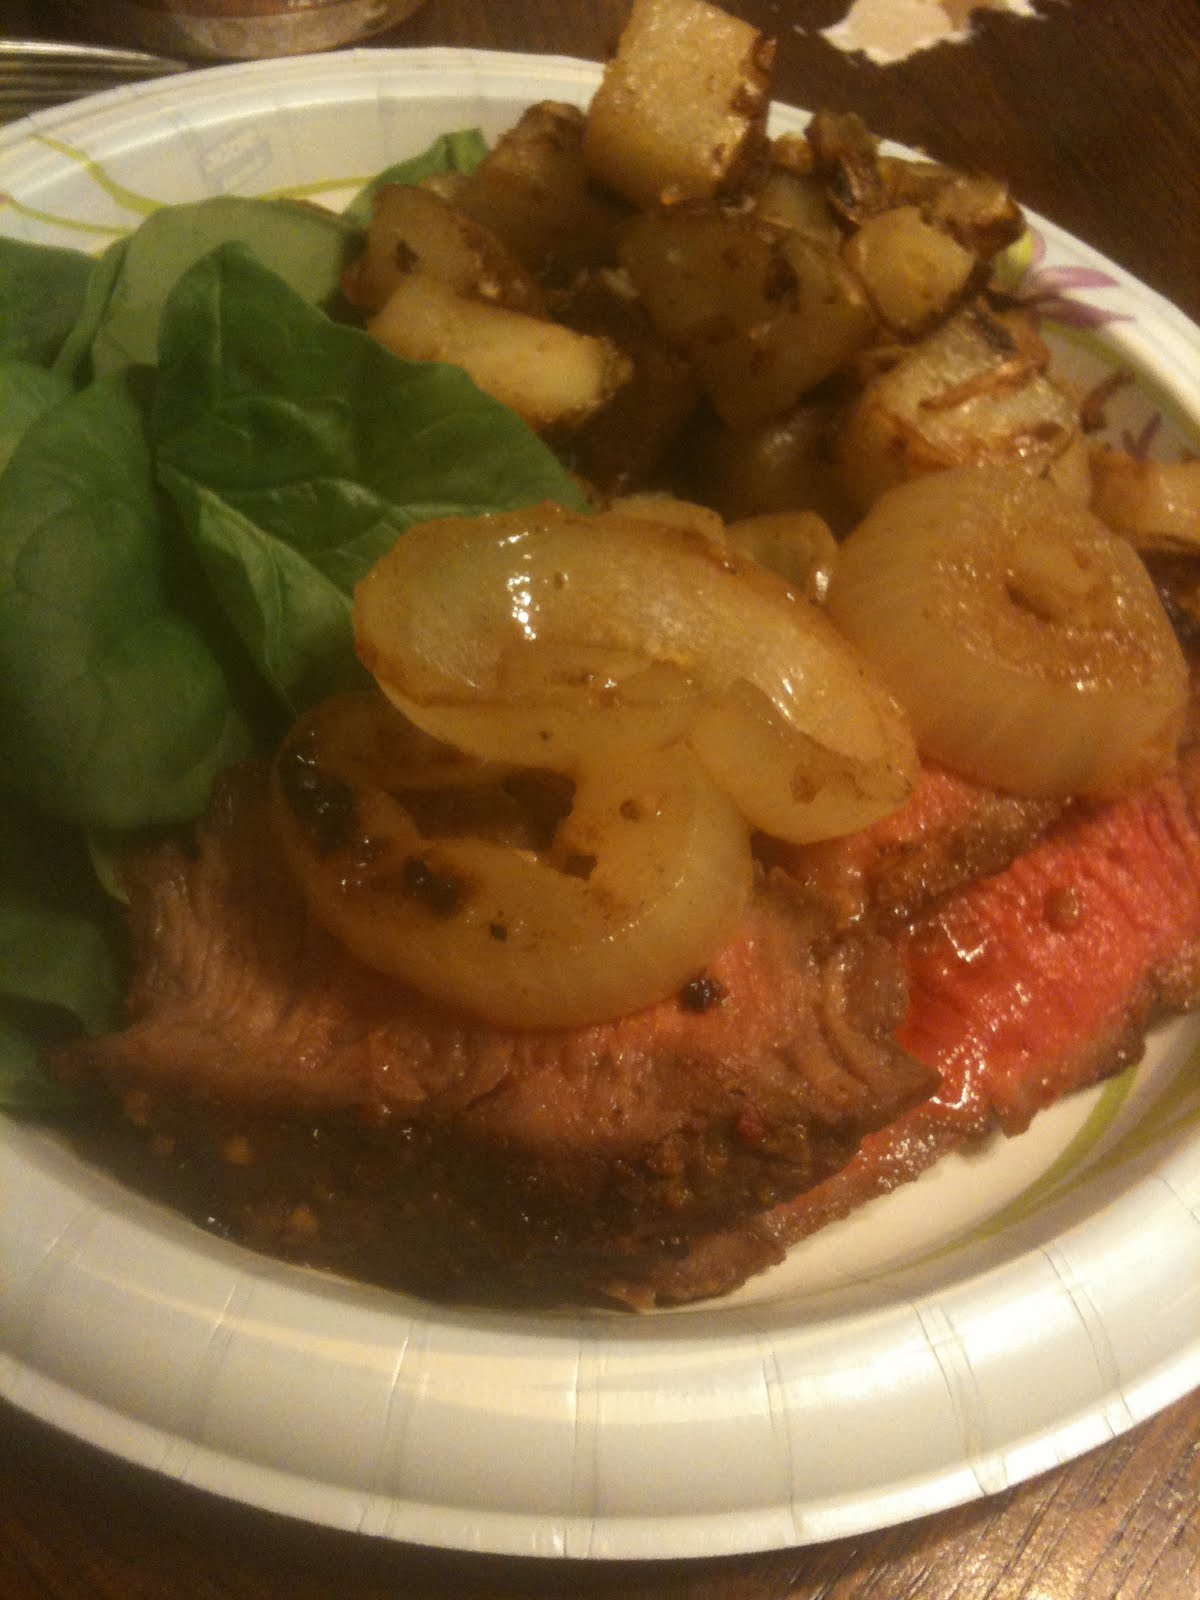
For the potatoes you cut the potatoes in to chunks place in a 13X9 pan coat with the oil and onion soup mix. Place in a preheated 425 preheated oven for 25-35 min tossing occasionally until golden brown. While that is baking in the oven. Pull out the Flat Iron Steak and cut on the diagonal, then turn and cut on the opposite diagonal only about 2-3 cm into the meat. Do this on both sides of the flat iron steak. Then with the onions sliced place on a foil lined cookie sheet/jelly roll pan. Next you will want to sprinkle generously the seasoning on both sides of the flat iron and rub in. This will give it a nice crust and flavor to the meat. If you have a separate broiler then broil for 5-8 min each side for medium rare. let rest for 5 min. and then slice against the grain into slices. Serve with the roasted potatoes and the slices of onion along with a fresh leafy green for a yummy, EASY Meal :)

Tuesday, December 14, 2010

Red Velvet Cookies


As I was making the Pumpkin Chocolate Butterscotch cookies, I also wanted to make red velvet cookies. I have never made even cupcakes that were red velvet. I looked on allrecipes.com as to how to make these. I was surprised that there was actually cocoa in red velvet, as well as sour cream. Luckily I had just enough sour cream. :) I also happened to have two bags of the betty crocker sugar cookie mix in my food storage. :) Double score! :) So I decided to make them.

Ingredients:
1 (1 pound 1.5 ounce) pouch Betty Crocker® sugar cookie mix
1/3 cup unsweetened cocoa
1/4 cup butter or margarine, softened
1/4 cup sour cream
1 tablespoon red food color
1 egg
3/4 cup Betty Crocker® Rich & Creamy cream cheese frosting
1/4 cup chopped nuts
Directions:
Mix cookie mix, cocoa, butter, sour cream, food color and egg in bowl until soft dough forms.
Roll dough into 1-inch balls; place 2 inches apart on ungreased cookie sheet.
Bake at 375 degrees F for 8 to 9 minutes or until set. Cool 2 minutes; remove from cookie sheet to wire rack. Cool completely, about 15 minutes.
Frost cooled cookies with frosting. Sprinkle with nuts. Store tightly covered at room temperature.

I didn't have any nuts, so I skipped that option. Other than that I followed the recipe. Braeden said they were yummy and he couldn't even taste the sour cream. (mind you he HATES sour cream). so that was a GREAT thing :) They are light and airy. Pretty tasty :) Enjoy!

Pumpkin chocolate butterscotch cookies


I love baking cookies! Don't you? Doesn't everyone?! I can't see why not. I love the joy of eating the cookie dough, the smell of the cookies baking in the oven, and the warm cookie with a cold glass of milk... ah... the good stuff, that's the joy of life... isn't it... I think so...

Well, enough about me and my obsession with cookies, well, baking in general. I believe that cookies make the world a little brighter place. Today's recipe came about because at first I was going to make some pumpkin chocolate chip bread. Then i thought, I know a scary thing... Can I make pumpkin chocolate chip cookies. I found a recipe on allrecipes.com for pumpkin chocolate chip cookies. I liked the recipe that used oil instead of butter, since I'm out of butter... I know another travesty... So, I decided I would double the recipe so I have enough for my kids to have some and for me to give some away. (I love sharing food with others :)) So, in doing that, I realized that I had 1/2 a bag or 1 cup of butterscotch chips that needed used, and I wasn't wanting to put them in regular chocolate chip cookies. I thought (I know I need to stop that) these would be good in my pumpkin cookies.... So here is what ingredients I used :) Enjoy!
And yes, I've already had some of the dough and a fresh warm cookie... mmmmm tasty... I think I will eat another one soon... now I'm craving them! Darn them!!!

Ingredients:
2 cups canned pumpkin
2 cups white sugar
1 cup vegetable oil
2 egg
4 cups all-purpose flour
1 tablespoon and 1 teaspoon baking powder
1 tablespoon and 1 teaspoon ground cinnamon
1 teaspoon salt
2 teaspoons baking soda
2 teaspoons milk
2 tablespoons vanilla extract
2 cups semisweet chocolate chips
1 cup butterscotch chips*
Directions:
Combine pumpkin, sugar, vegetable oil, and egg. In a separate bowl, stir together flour, baking powder, ground cinnamon, and salt. Dissolve the baking soda with the milk and stir in. Add flour mixture to pumpkin mixture and mix well.
Add vanilla, chocolate chips and butterscotch chips*.
Drop by spoonful on greased cookie sheet and bake at 350 degrees F (175 degrees C) for approximately 10 minutes or until lightly brown and firm.
Makes at least 4 dozen cookies
Recipe from Allrecipe.com

Monday, December 13, 2010

Easy quick beef stew with noodles

So, tonight was my quick, I mean really quick dinner night. I was tired and it was cold out. I didn't want to do too much. It was really supposed to be reheated leftover night, but instead, I pulled out an old classic at my house. Now, those who REALLY know me... know that I like to cut corners, I know this is supposed to be a blog about cooking from scratch... but sometimes, this is as from scratch as it gets.

Ingredients:
2-4 cans of beef stew (store premade canned) depending on your family size
1 Lb egg noodles
6 Qts of water (to boil the noodles in)

Directions,

In a sauce pan - heat the beef stew, in a large pot boil water, add egg noodles to it, salt the water to flavor the noodles, boil noodles for 6-8 min depending on desired tenderness. Drain noodles, return to pot. Once the beef stew is heated through, pour on top of the noodles, stirring to incorporate the beef stew with the noodles. Serve...

Mind you, this isn't at all from what some would call scratch, and for some, this is what they mean from scratch. This is a nice quick warm dinner that my kids enjoy, and I like to make when in a pinch. My middle child Braeden - He had 3 or 4 helpings of this. He LOVES beef stew no matter if it's from scratch or store bought. This is a really quick easy dinner. I hope you enjoy, Even mommies who usually cook from scratch need a night off. Enjoy! we sure did :)

Sunday, December 12, 2010

Peach Cobbler

This is my absolute favorite peach cobbler recipe. I got it from a great friend in Winchester, Virginia. After I had her's I don't make any others. :) This recipe was given to me by Sister Shake. She is amazing. I think of her sweet spirit each time I make this. Her sweet smile. Ah, good times. I hope you enjoy this recipe as much as I do.


Ingredients
2 cups of milk
2 cups self-rising cake flour (self-rising flour sifted works fine too)
2 cups sugar
1 stick of butter - diced into small pieces
1/2 cup oil
2 cups peaches in heavy syrup (or *homemade canned peaches in syrup)
*1-2 tsp cornstarch and water(only if using homemade canned peaches)

Mix together the milk, flour, sugar and oil.


In a medium sauce pan heat the peaches until the liquid is thickened. *If you are using the homemade caned peaches once the liquid is boiling add the dissolved cornstarch mixture and stir constantly until thickened. Remove from heat.


Pour the peach thickened mixture into a 13X9 pan, add pats of butter evenly on top of the peach mixture.


Next pour the milk, flour, sugar and oil mixture on top. stir slightly to evenly distribute the milk mixture.


Place in a preheated 350F oven for 30-35 min. Till the top of the cobbler is browned. Remove from oven and enjoy either warm or cold, with ice cream and/or whipped cream. This is even delicious plain with no toppings :) So Good!

Cheddar Bacon Burgers


Now, this one I'm sure you all know how to make Cheese Burgers. My husband said I needed to put this on here because he loved the one's I made the other night so much he wanted me to share. I season my hamburger patties before I pan fry them. And I'll share my other secrets too... I could also do this on the grill I'm sure, but I haven't braved the cold and wet yet for the grill. One of these days I will conquer my fear of the grill, just not right now.

Ingredients:
8 hamburger patties
Worcestershire sauce
smokehouse maple seasoning
sea salt and pepper
1 lb bacon cut in half
1/2 lb cheese slices - depending on thickness and if you like two slices of cheese per burger.

Directions:
Place bacon on a cookie sheet lined with parchment paper. Bake in the oven 450F for 20-25 min for desired doneness. While bacon is cooking in the oven, on a platter lay out all hamburger patties - at room temperature. Then sprinkle the maple seasoning, salt and pepper on both sides of the burger patties. Heat a medium to large skillet on the stove. Place the burger patties in the skillet only those that fit, sprinkle/dash the Worcestershire sauce about 2-3 on each burger patty, once browned on one side, flip and repeat the Worcestershire
sprinkle/dash on the other side. When the bacon is done remove from oven and set aside. While the burger is cooking cover the pan with a lid. Once the burger is done on both sides. place cheese on top of the burger and cover pan with lid, until cheese is slightly melted down all sides of the burger.


remove and place on a hamburger bun with your favorite toppings. Layer the bacon on top of the cheese. Enjoy!

** Baking the bacon in the oven heats the bacon evenly limiting the curves of the bacon to create a nice flat piece of bacon for the burger. :)

Shepherds Pie

I love, love, love shepherds pie! It is such an easy thing to make, and so delicious. My mom used to make this when I was a kid. It was different every time, but still so familiar. For me, it depends on the cheese I have on hand, or decide if I want to make a white sauce or a red sauce... If I make it with a white sauce, I skip the green beans and substitute mixed veggies. If I use red sauce it's the green beans for the veggie. I've made this several ways, the olives are optional with the red sauce, as my family doesn't like olives, but I do, so when I'm feeling a little frisky I add the olives to shake it up a bit. I try not to tell them it is in there. Or I end up with none of them eating, and i have a 13X9 dish of shepherds pie to eat all by my self... is that bad?! I don't think so, I will eat it for lunch for a whole week. :)) Lucky me! :)

Ingredients
1 lb ground beef
1 jar/can spaghetti sauce or alfredo sauce
1-2 cans of green beans or mixed veggies
6-8 potatoes (made into mashed potatoes) or 2 bags of instant mashed potatoes
1-2 cups of shredded cheese, or 6-8 slices of cheese
1 can minced black olives (optional)

brown ground beef with minced onions or just seasoned with salt and pepper. Mix in the spaghetti sauce. Pour into a 13X9 pan adding the olives (optional)


then sprinkle the cans of drained green beans on top.


Next Layer the mashed potatoes on top of the green beans.


then sprinkle the shredded cheese on top.


Bake in the oven preheated to 350F for 30-35 min. Till heated through and bubbly. Remove, serve warm. Dig in! and yummy :)

Peach Cranberry Glazed Pork


I was looking on line for a peach cranberry glaze for my pork roast for dinner and I couldn't find one. I'm trying to use ingredients that I have around the house and so that is what I had. I had read cranberry glaze recipes and peach glaze recipes but I didn't have all of the items needed to make those. So, using the ingredients I had at my house, I created this glaze. I had my picky 7 yr. old try the glaze, he said it was good. Therefore, I went with it. :) gotta love the honesty of a 7 yr. old. :) This will give the pork a nice glaze and sweet tangy flavor.

Ingredients:
1 - 16oz jar jellied cranberry sauce
1- 18 oz jar peach jelly
2 Tbsp balsamic vinegar
4 dashes of ground ginger
2 tsp minced garlic
1 tsp yellow mustard
1 cup brown sugar
4 tsp Ranch dressing mix
2 tsp kosher salt

Mix till well blended.


Glaze on to pork roast - Bake according to pork Lbs.

When cooking the pork, I like to line the bottom of the baking dish with sliced onions, they become slightly caramelized with the glaze, which adds a great flavor to the dish.


When I was baking the pork, I started baking it covered for about 30-45 min. Then I removed the cover, and re-glazed the pork, left the lid off and cooked for another 40-50 min. then I reglazed the pork again. This time returning the lid on top of the dish. Again about every 30 min or so, I would glaze the pork until the internal temperature was between 150 and 160. Then I remove the pork from the oven and let it rest. While it rests, I added another coating of the glaze. While the pork continues to rest. I put the remainder of the glaze in a small sauce pan and thickened the glaze after it came to a rolling boil. I thickened the glaze with 1/4 cup water and 1 heaping tsp of cornstarch. I continued to let this stay at a rolling boil until desired thickness.

Once the glaze was thickened, the pork done resting, I removed the pork from the baking dish, removed the netting that helped keep the pork together during baking, cut the pork and then poured the thickened glaze and the onions on top of the cut pork.

Verdict... This was HEAVENLY! The pork with the glaze on it had such a nice flavor and aftertaste. It wasn't bitter in the least bit. It might have been too sweet for some, but for us, we liked it sweet. you could probably cut back on the brown sugar if you wanted for a less sweet taste. My kids ate a TON of this! I have a little left over, but I have more glaze than anything left over. I am tempted to save the glaze for another pork dish later on. But I'm not to sure if it would be good saved. I hope you enjoy this as much as we did. My husband had his eyes rolling back in his head, and my kids did even want a drink until they were finished eating this delicious pork dish. Enjoy!

Thursday, December 9, 2010

Slow cooker Smothered Pork Chops - Quick


This morning on our menu we have smothered pork chops. I had bought at reduced price, a package of bone-in pork chops, and stuck them in the freezer for a later date. I thawed them in the fridge, and went to find my Campbells french onion soup. I was only able to find one can, I then checked my food storage where I found a Progresso French Onion Soup. It is much larger than the french onion soup by Campbell's, but I used it anyways.The first thing I did was cut out the bones. This is an easy step, but not needed if you don't want to. I do it because my husband doesn't like to cut around the bone when he is trying to eat. It is definitely cheaper to buy bone-in and then remove the bones when you get home either before you freeze or after. Here is how quick this came together after removing the bones.

Ingredients:
2 lbs bone-in pork chops (approx 8 pork chops)
1 can Campbell's French Onion Soup
1 can Progresso French Onion Soup
1 can Cream of chicken, mushroom or what ever soup (I used a can of Cream of Chicken with Herbs)
1-2 tbsp olive oil
sea salt and pepper for taste


In the 6 quart crock pot, I added the soups and mixed well.


Next I removed the bones from the pork chops and seasoned with sea salt and pepper.


Then I heated the olive oil in a small skillet and lightly browned/seared, the pork chops.


Once they were browned on both sides, I placed them in the crock pot with the soup mixture. and set on low for 8 hours.


My family loves this recipe. They are so tasty and quick and easy. It happens really quick because over high heat in the hot oil, they brown quickly, and then your done. You can serve this with noodles, rice, potatoes, or what ever starch you want. You could even top with cheese and brown in the oven to add further flavor and yumminess.

Tuesday, December 7, 2010

Split Pea Soup

The first time I tried to make split pea soup, it was gritty and yucky... so I'm trying it again... can you say, hard headed... yeah that's me. This time I thought, how about I try it in the crock pot to see if I can make it in there. That way it cooks a long time, it's gotta work... right.... Well, here's hoping.

I have it going in the crock pot. I put it in around noon today. If figured, 6 hours on high... it's gotta cook. Right?! Here is what I did, and I'll let you know how it turned out when it's done. :)

Ingredients:
8 cups chicken broth (mine is homemade)
1 cup chopped celery
1 cup chopped carrots
1 cup diced onion
1 bag of dried split peas - sorted and rinsed
2-3 cups diced ham for garnish

I added the chicken broth to the crock pot. Next, I added the celery, carrots and onion. Finally, I added the split peas. They are all cooking in one harmonious pot of yumminess. I have ham to add to it once it's blended, creamy and smooth. I am letting it cook at least 5-6 hours on high. Then I will remove, add about 1/2 cup of half and half. and blend well. Served with diced ham and french onion straws.

Friday, December 3, 2010

Grandma Lancaster's Poprikash

This one is for you Laney :)

Poprikash
by Pauline Lancaster

3-5 lbs. chicken skinned
2 lrg onions finely chopped

Put chicken in large pot and boil with one tbsp salt.

Debone Chicken. Throw away the bones.

In another pan braise or boil onions until soft and change color.

Add 2-3 tbsp paprika to onions, after chicken is cooked, remove from pan, add onions and more water to pan (that the chicken was in). Add the chicken back in. Then bring to rolling boil. Add dumplings by spoonful of dough into the boiling soup water.

Dumplings,
4 eggs
1 tbsp salt
1 1/2 cups water or more
add flour to make stiff dough

plop dough in boiling water by 1/2 tbsp til dumplings are done (floating at top).

paprika and salt to taste. Then enjoy :)

Verdict:
My grandmother used to make this for us on cold days. It really warms the soul. I have fond memories of her making this in her kitchen. The smells, the sounds, and the family time spent. I had a special request from a dear family member to add this to my blog. I hope you enjoy this as much as we do. It's a simple dumpling and chicken recipe. Not too complicated. My kids favorite part are the dumplings. They are my favorite part too... but they are so flavorful and yummy in this it's hard to resist :) Even fun for making on as a halloween dish... My kids said they look like little floating brains :) what fun kids are! ;)

Thursday, December 2, 2010

Eggs in a Nest


This morning, I was craving eggs and buttered toast, but also maple syrup... Doesn't that just sound delicious? I thought so this morning. So, I of course put my own spin on it... It was SOOO good... I had to share, and not only that but my middle son Braeden, reminded me to take a picture,.. he thought it was YUMMY! He said "Hey, mom, Take a picture.. this is homemade and yummy... even the bread... " I of course made this for him before I made mine, and his was all gone... So, I made myself this and Oh boy.... yummy!

Ingredients (makes two)
2 slices of bread (preferably homemade)
2 eggs
butter
salt and pepper to taste
toaster
skillet

Directions:
Place thick slices of bread in the toaster, in a skillet melt at least 2 tbsp butter. Once the toast is toasted in the toaster, place in melted butter in skillet. Turn over quickly to butter both sides with melted butter. Then cut a criss cross pattern on the inside of the bread between crusts, then crack one egg onto each piece of toast. and cook one side till brown, then flip and cook till browned. Sprinkle with salt and pepper to taste. Then remove and drizzle maple syrup on top... if you don't like runny eggs, cook longer over lower heat.. to cook till done to likeness. I however, LOVE runny eggs.

Verdict...
Heaven for breakfast... sweet, salty, eggy, buttery, toasty, mapley... what could be better, Not much. It's late and I'm getting hungry for some for a late night snack... mmmmm yummy

Cranberry Brisket - Slow Cooker

This one's for you Bonnie....

I read a couple brisket crock pot recipes from 365 Crockpot and one of them used cranberry sauce and another one used liquid smoke, A1 Steak sauce, I thought, I bet they would be good semi combined... so, I made up my own, cranberry brisket recipe.

Ingredients:
1 quarter brisket (approx. 1-3 lb.)
8-10 oz of jellied cranberries
3-4 sprinkles of liquid smoke
Steak seasoning - enough to cover all sides of brisket
6-7 dashes of Worcestershire sauce
A1 Steak sauce - enough to cover top side of brisket
foil

Directions:

Trim most of the fat off of the brisket. Leave some on for flavoring...Sprinkle Steak seasoning all over the brisket, all sides should be covered. Place in the crock pot
(I used my 6 quart) fat side up... sprinkle the Worchestershire sauce on the brisket, then the liquid smoke, Then pour the A1 Steak sauce on the brisket. Next add the jellied cranberries to the pot... spreak some on the brisket and around the brisket in the crock pot. Then any remaining room in the crock pot cover with foil to keep the smoke closer to the brisket. Set on low for 8-10 hrs, or high 3-4 hours. When finished, you can pull or slice.

Verdict..

No leftovers! I had two helpings myself. My pickiest eater... Mikey... He ate his first helping, then filled his whole plate with more... Then proceeded to eat the rest... He at at least 2 adult portions.. if not more. This was a really tasty dinner. My husband said it was nummy.... The other two boys ate theirs up with no complaints either. That's a win in my book. Easy and no fuss. Can't beat that... little to no clean up if you use the crock pot liners too... We served this with rice, corn and rolls. :)

And I'm sorry, once again, forgot to get pictures. I'll try to do better. :) Busy with finals this week, I'm all messed up... :)

Monday, November 29, 2010

Pasta Carbonara with peas

My favorite pasta sauce is carbonara... what's not to love, creamy white sauce with bacon (or bacon substitute) and cheesy goodness... I know dreaming of yummy sauciness right now! ah... ok little drooling over,... maybe. As I dream in cheesy, creamy bacon filled pasta sauce.... I decided to do a little semi-homemade from scratch dinner, quick and easy while still being full of yummy flavor. Such a simple easy recipe... it's fool proof... well practically. So, After a HUGE thanksgiving meal, I wanted something quick, easy and delicious. I wanted pasta...I checked the cupboard for what I had on hand... luckily for me... I almost always have on hand spaghetti sauce, pasta noodles, and some kind of additive to make it just a little more special... I looked through my stash of goodies... and found a hidden bottle of garlic parmesan cheese sauce... (white sauce to my kids). And then I had a genius moment.... I know rare for me... I haven't had carbonara sauce in a long time... I thought, it can't be that hard,... can it... especially since the pasta sauce is practically finished... I had cooked up bacon during lunch thinking it would be good for BLT's or added to a turkey sandwich (yes I'm still eating leftover turkey)... I bake my bacon in the oven for 400F for about 15-20 min, turning over about half way through. This keeps the shape of the bacon pretty well, and less splatter on me and my counters. It is a trick I learned on the FoodNetwork channel. So with the already cooked, drained bacon, a jar of pasta sauce... a pound of noodles and a can of sweet peas... Dinner was done :)

Ingredients
1 lb pasta of choice cooked al dente
1 jar of Ragu garlic parmesan cheese sauce
3/4 lb bacon - cooked, drained and chopped
1 bag of frozen sweet peas (thawed and drained) or 1 can sweet peas

In a small sauce pan, while the pasta is cooking in salted water, add the pasta sauce, bacon and peas. Simmer until the bacon becomes pliable again. (if your bacon was cooked to crunchy as my son calls it) The bacon will infuse the sauce with a bacon flavor... about 5-7 min... about that time the pasta should be done cooking. Once the pasta is drained, add the pasta sauce to the pasta and mix well, incorporating the bacon and peas throughout the pasta, then serve and sprinkle with fresh parmesan cheese or dig right in... That quick and easy. leftovers are good the next day too... I had them for lunch and even shared with a friend, who said it was amazing! :)

Verdict... Delicious... but don't just take my word for it... try it and share what you think... I'll be making this again... Gotta love bacon, cheesy sauce and mmmm pasta... drooling again... not good.... I think I have a problem... Too yummy!*** sorry no pictures, this was eaten and made too fast for pictures. :)

Thursday, November 25, 2010

Grandma Clark's Dinner Rolls


Bill's Grandma Clark (may she rest in peace) made these amazing dinner rolls, before she passed away, I had the honor of putting together a cookbook of her recipes for the family. It was an amazing experience. The family has this recipe, but it should be shared with the world. These are by far the BEST rolls ever made. Of course, my rolls using this recipe and my father-in-laws rolls using the same recipe come out differently. I don't know how or why... they just do. But the way I make them... They are HEAVENLY! So hopefully yours will turn out as heavenly as mine. :) Here is the recipe...

Ingredients:
2 pkg yeast
1/2 c luke warm water
1 1/2 cup luke warm milk
1/2 cup sugar
1 tsp salt
7-7 1/2 c flour
1/2 c soft butter
2 whole eggs

YEAST:
Combine the yeast and warm water with a sprinkling of sugar and let rise.

Separately:
Combine in a mixing bowl with dough hook, milk, sugar, salt, soft butter, and eggs. Then add the risen yeast mixture.

Begin mixing in flour - 1/2 c at a time (up to 7 1/2 cups if necessary) mix by hand

Place mixed dough into a buttered bowl, cover and let rise in warm area - 1 1/2 hours or double in size

Punch down, turn dough over in bowl and let rise another 1 1/2 hours or double in size.

Punch down, form into rolls, let rise on cookie sheet, brush with melted butter.

Bake in a 400F oven for 10-12 min or until brown.

Verdict...
HEAVENLY Rolls... I make these for all special occasions and when we want yummy rolls. I warm the milk, butter, sugar, and salt in a sauce pan on the stove just until the butter starts to melt. To help the milk be the proper temperature for the yeast to keep growing. :)

I also, brush them with more melted butter once they have been removed from the oven for added yumminess!

Sausage, Bacon, Apple Stuffing


Since I was going all out this thanksgiving with 9 pies, turkey, homemade rolls, creamed peas with pearl onions, green been casserole, mashed sweet potatoes with marshmallows, mashed potatoes... That I would not just do a box mix stuffing, but a "fancy" stuffing. One with yumminess in it to make it over the top! I wanted to stuff my turkey with flavor. So here is the stuffing I used. It as good. :)

Ingredients:
1 - 16oz bag of cubed stuffing - white and wheat blend
1 box cornbread stuffing
3 cans chicken broth
2 granny smith apples - cored, peeled, and diced
1 lb bulk ground sausage
3/4 lb chopped bacon
1/2 onion diced
1 cup celery diced
1 cup chopped mushrooms
1/4 tsp cumin
1/2 tsp basil
Salt and pepper to taste

Directions
Brown and drain the sausage, set aside. Brown and remove the bacon - keeping the bacon grease. cook the chopped onion and celery til translucent in the bacon grease. In a large bowl, put the stuffing mixes in, the drained sausage, the browned bacon, mushrooms, apples, cumin, basil and salt and pepper to taste. Add the onions and celery and mix well. Add the cans of chicken broth one at a time, once the stuffing is as moist as you want, then stuff the turkey, or place in a 13X9 prepared baking dish. If using the baking dish, bake in a 350F oven for 30-35 min.
The turkey stuffed will help cook the stuffing further.

This is a delicious stuffing mix. My husband said he could tell the added flavor helped the turkey taste even better. With the aroma of bacon and sausage, and the sweetness from the apples. MMM so yummy. I hope you enjoy. Let me know what you think of this stuffing mix. :)

AMAZING Thanksgiving Turkey

I decided to make my first thanksgiving turkey this year. I have never in my life ever made a turkey. I have been so very intimidated by making a turkey. My husband doesn't really like turkey's either, so I usually make ham for thanksgiving. I decided it was time to stop being so intimidated by such things. I talked myself into cooking the bird. I asked my husband to forgive me if it wasn't good and if it was dry. I did my research and read a few things on how it is best to cook a turkey and if I needed to brine it. I decided to brine my turkey. I put it in the brine by noon the day before I wanted to cook it. For instructions on what I did with my brine. Check my post on Turkey Brine. For cooking it... I did a few things...

Ingredients:
1 12-14 lb turkey - brined
softened seasoned butter - your choice of seasoning
1 large roasting pan with rack
paper towels


Preheat the oven to 350F. Remove turkey from brine and pat dry with paper towels. Make sure to dry it well. Place the dried turkey in the roasting pan. Stuff with stuffing (optional).


Spread the softened seasoned butter all over the turkey with your hands.


Once the oven is preheated and the turkey is smothered all over with the seasoned butter. It is ready to be placed in the oven. Make sure the oven rack is on the second to last rung. Remove the turkey when the breast temp internally is 165F, Approx 3 hours. Periodically baste the turkey with drippings from the turkey to help it have a more uniformed brown skin. Let the turkey rest for 20 min before carving (this will help the turkey remain moisture).


Verdict...

My husband who doesn't like turkey, said it was the BEST turkey he has ever had. So flavorful and delicious. He couldn't stop eating it as he was carving it. I stuffed my turkey with a Sausage, Bacon, Apple stuffing which I will be posting the recipe in a separate post. This was by far the best turkey I have ever had. My kids LOVED it, too! This was the most delectable turkey, so moist, and flavorful! It tasted heavenly... I will be making this again!!! :) I hope you all had a fabulous Thanksgiving and if you try this Turkey recipe... it is AMAZING!

Wednesday, November 24, 2010

Turkey Brine

This year is my first year to EVER make a turkey... I know shocker... Well, since we are not really having family over for Thanksgiving this year as we are in Utah and they are in other parts of the country. We are going to try our hand at a traditional Thanksgiving. I have made hams in the past as my husband isn't a turkey fan. So, this year, I got a turkey and decided it was time I try to make a yummy turkey. I had been reading about the best way to prepare a turkey. The census was to brine the turkey. Monday I started thawing my turkey in the sink with cold water. Rotating my turkey every few hours to evenly thaw. Today is Wednesday, tomorrow is Thanksgiving and I decided that since my bird is thawed I should start brining it. I watched a video of how to brine a turkey, and they said it should brine for 3 days! UGH!!! I don't have three days to brine a turkey. I had my mini heart attack and then read further brining methods and realized it was anywhere between 12 hours and 3 days depending on how long you wanted to brine it. Luckily, my sister called and helped calmed me down... So I stopped stressing and got to work on my brine. This is a compilation of things I read that sounded good and what I had in the house. So, I will post how it turned out. Also, stay tuned for the final turkey preparations in a future blog posting.

Ingredients:
1 12-14 lb turkey, thawed and at room temperature (Not a Kosher or prebrined turkey)
1 cup kosher salt
1 cup granulated white sugar
1 gallon water
6 cups of ice
1 turkey bag
1 cup chopped carrots
1 cup chopped celery
1 cup diced onions
3 Tbsp Rosemary and Garlic seasoning
1 tsp old bay seasoning
1/2 tsp thyme
1 tsp course ground black pepper
1 cup apple cider vinegar


Ingredients in my Brine


In a large pot, bring to boil the 1 gallon of water. Once the water has a rolling boil, stir in the sugar and salt. Once dissolved turn off the stove and add in all ingredients EXCEPT the turkey bag and the ice. Stir to incorporate all ingredients. Once all other ingredients are incorporated add the ice and stir until dissolved. This will help bring the mixture to room temperature, so that you can start brining your Turkey. In a large 5 gallon bucket. (One I had on hand from Food Storage). I lined with the turkey bag pulling sides up and over the outside of the bucket. Then pored the brine mixture in the bag. Made sure it was room temperature.


Turkey Brine in the Turkey bag inside the 5 Gallon Bucket


Then placed the prepared bird in the brining mixture. Making sure it was completely covered.


Turkey Brining in the Turkey Bag in the Garage


Closed the bag over the turkey and placed in the garage. (We have below freezing temperatures today and tomorrow,) so I am using my garage as the refrigerator today. My refrigerator does not have enough room for the bucket. The other option if you do not use the bucket is to place the bird in the bag with the brine and keep it in your meat drawer turning the bird over half way through the brining process. To ensure even brining. Brine for 12 hours to 3 days, depending on your time and preference.

Once you are ready to cook the bird, remove from brine. Throw away brine (pour down the sink or toilet). Pat turkey dry and then either cover with seasoned butter or canola oil, for a nice brown crisp skin. :) Cook per package directions. Enjoy!

I am hoping this turns out yummy. It sounds good. I will let you know how it goes tomorrow. I am looking forward to a delicious turkey dinner. :)